PXE Booting Raspberry Pis
Raspberry Pis are super useful. You can use them in many various ways. I use Raspberry Pis with PiHole to block websites and ads on my entire network, Octoprint to remotely control and monitor my Prusa, DietPi to run a few services such as Gitea, Drone, and MkDocs for my home documentation, and Home Assistant.
While I have not had any problems (yet), MicroSD cards often fail. One way to get around this is to boot off of a USB drive or even a USB hard drive. Starting with a Raspberry Pi 3 B+, you can boot over the network using PXE. What is PXE booting you ask? Well Wikipedia sums it up very nicely:
In computing, the Preboot eXecution Environment, PXE (most often pronounced as /ˈpɪksiː/ pixie, often called PXE Boot/pixie boot.) specification describes a standardized client–server environment that boots a software assembly, retrieved from a network, on PXE-enabled clients. On the client side it requires only a PXE-capable network interface controller (NIC), and uses a small set of industry-standard network protocols such as DHCP and TFTP.
https://en.wikipedia.org/wiki/Preboot_Execution_Environment (accessed 2022/8/27)
What You Will Need
- Raspberry Pi
- MicroSD Card
- PoE Hat (optional but recommended)
You might be asking, “If we are going to be booting over the network, why do I need a MicroSD card?” That is a good question. We need the MicroSD card to be able to flash the Raspberry Pis EEPROM and enable network booting. We also need the MicroSD card to make the ‘golden image’ for each operating system that will be used.
Setup
My Setup
I have the following setup:
- OPNsense for DHCP/Firewall
- Ubuntu Server as my TFTP/PXE boot server
- Raspberry Pi OS
- Raspberry Pi 4B – 4GB
- Samsung Evo 16GB MicroSD Card
I chose to use Ubuntu Server to run the TFTP/PXE server. I am running it in a VM on my Unraid server. Realistically, you can use another Raspberry Pi with an external drive hooked up, or I have also seen instructions on how to set up a Synology NAS to work.
I am making a ‘golden image’ of Raspberry Pi OS for my example. After making the golden image, I will then copy it to set up Moonlight on a Pi that will be netbooted.
For OPNsense, I will be using VLAN 35 which I have set up specifically for PXE booting Raspberry Pis. How to do this is beyond the scope of this guide but if there is interest, I will make a guide on how to do this. Throughout the guide, you will see me using the IP address “192.168.35.252” as the server and “192.168.35.101” as my Raspberry Pi IP address. These are statically assigned in OPNsense and will be different in your setup.
TFTP Server Setup
I am using a Ubuntu Server VM on my Unraid server as my TFTP server in this case. You can use Raspberry Pi OS for this as well. It should work for other Linux based operating systems as well. This system should be able to stay on 24/7.
When the operating system is install, run the following commands to make sure it has the latest packages:
sudo apt update && sudo apt upgrade -y && sudo apt dist-upgrade -yNext, create the folders that will be used to store the boot files and the system files for each Raspberry Pi. In my example, I will be using “/piboot” and “/pisystem”. You will want to keep them consistent. I recommend putting whatever you use on the root system because if you put them in a system folder such as /mnt, you may have problems down the road. I am talking from experience here. /piboot will be used to host the boot system files for each Raspberry Pi. We will eventually need to make multiple folders in this directory that is specific to each Raspberry Pis serial number. The /pisystem will hold all of the rest of the files. Again, you will need to make a folder for each operating system but it can be anything you want, as long as it is unique. I personally use the host name of each system.
sudo mkdir /piboot /pisystemNow for the TFTP server. I will be using tftp-hpa. I tried tftpd but couldn’t get it to work. As far as I have seen, they are both basically the same setup though. I will also be installing “nfs-kernel-server” which will be taking care of the NFS that we will be utilizing.
sudo apt install tftpd-hpa nfs-kernel-server -yThere really isn’t anything to do with nfs-kernel-server but we do need to do a little configuration on tftp-hpa.
sudo nano /etc/default/tftpd-hpaThis will bring up the nano editor. Again, if you have another choice editor, feel free to use it. Edit the file to look like this:
# /etc/default/tftpd-hpa

TFTP_USERNAME="tftp"
TFTP_DIRECTORY="/piboot"
TFTP_ADDRESS=":69"
TFTP_OPTIONS="--secure --create"
The 2 lines we are changing are “TFTP_DIRECTORY” and “TFTP_OPTIONS”. For TFTP_DIRECTORY, change it to /piboot if you are using the same folder system as this guide, or whatever you are going to use as the boot folder. For TFTP_OPTIONS, we are just appending --create at the end of the string so we have the ability to create files on the server. Now press CTRL+X to save, Y to confirm the save, and then ENTER to use the same file name. Now, chown the directories you created so we have access to them and restart the tftp server with the following:
sudo chown tftp:tftp /piboot && sudo chown tftp:tftp /pisystem
sudo systemctl restart tftpd-hpa
One thing that I highly recommend doing is setting up a static IP address for this machine. As mentioned earlier, I have mine set up to statically live on “192.168.35.252”. You can either do this on the operating system itself by editing /etc/dhcpd.conf. MakeUseOf has an excellent guide on how to do this. Though it is aimed at the Raspberry Pi, you should be able to use this method for any Linux based system. I prefer to statically set IP addresses on the router side. It makes things easier to manage. Since there are many different settings for routers, it is impossible to make an all encompassing guide on how to set a static IP. Googling ‘<router model> static ip’ should give you a guide on how to do it for your router.
Now that we have the TFTP server set up, we can move over to the Raspberry Pi.
Flashing EEPROM to PXE Boot
There are a couple of ways that we are able to enable PXE booting on a Raspberry Pi: Through the Raspberry Pi Imager, and manually editing and configuring the bootcode file. I will outline both methods.
Raspberry Pi Imager
Using the imager is the fastest and easiest method, but it does not offer any customizations. It basically sets up the MicroSD card with the configuration of booting in the order of MicroSD -> USB -> Network.
You will need a MicroSD card that you are not afraid to lose all of the data on. It could be pretty much any size since it uses only 1MB of space.
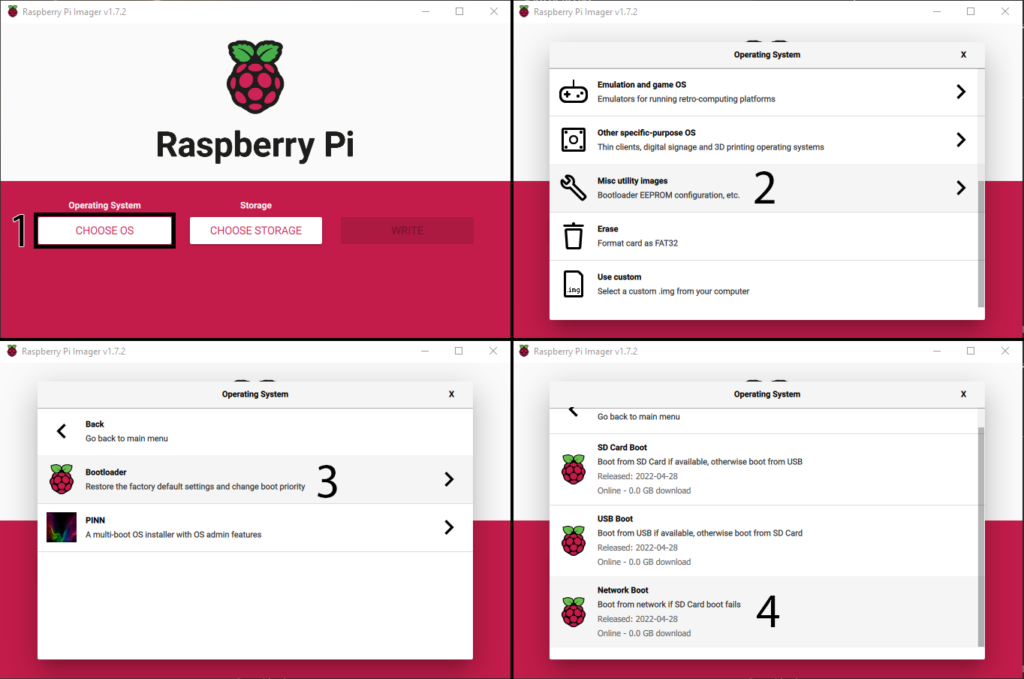
- Click on “CHOOSE OS”.
- Scroll down to the bottom of the list and click on “Misc Utility Images”.
- Click on “Bootloader”.
- Click on “Network Boot”
- Once you are back in the main menu, click on “CHOOSE STORAGE” and choose your MicroSD card.
- Click on “WRITE”.
Once the Raspberry Pi Imager has written and verified the MicroSD card, you can take it out and place it in to the Raspberry Pi that you wish to PXE boot. Power on the Raspberry Pi and after a few seconds, the status LED (green) will flash in a consistent rapid pattern. If you have a monitor hooked up, the screen will turn blindingly green. This indicates that the EEPROM was successfully flashed. You can use the same MicroSD card to flash every Raspberry Pi that you have.
The Manual Way
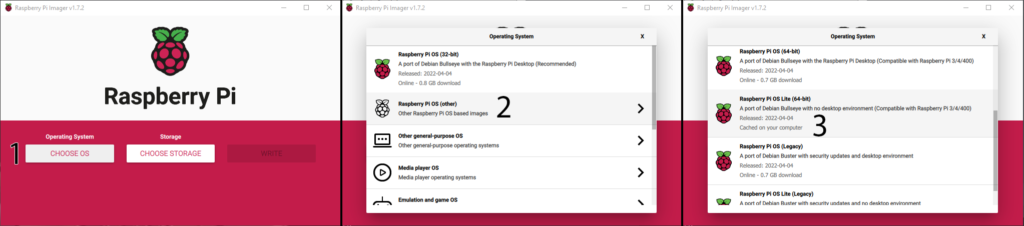
If you want to be able to change the boot order or customize the options of the bootloader, you will have to load an operating system and do some manual configuration. It is not hard to do though. You will need to install an operating system. Since I will be makin a golden image from Raspberry Pi OS Light anyways, I will be using it to demonstrate the process. Again, I recommend using the Raspberry Pi Imager to flash Raspberry Pi OS.
The process is pretty much the same as before. I am using the Raspberry Pi OS Light 64 bit image since I am running Raspberry Pi 4s in my network. If you are running anything other than a Raspberry Pi 4, you are safer to use the 32 bit image. The light version can be found in the “Raspberry Pi OS (Other)” category.
Once the operating system has been flashed, load the MicroSD card in to your Raspberry Pi and start it. When you get to the command line prompt, enter the following to update everything:
sudo apt update && sudo apt upgrade -y && sudo apt dist-upgrade -yPretty standard commands. This should get everything updated and ready for the next part. First, we need to figure out what the latest bootloader is.
ls -al /lib/firmware/raspberrypi/bootloader/stable/At the time of writing, the latest version is “pieeprom-2022-08-02.bin”. This will likely be different so replace the commands below with the version that is latest for you. Now execute the following:
cd ~
sudo cp /lib/firmware/raspberrypi/bootloader/stable/pieeprom-2022-08-02.bin pieeprom.bin
sudo touch bootconf.txt && sudo nano bootconf.txt
This will open up the nano text editor. It’s what I like but you can use the editor of your choice. You can read up on all of the options in the official documentation.
[all]
BOOT_UART=0
WAKE_ON_GPIO=1
POWER_OFF_ON_HALT=0
DHCP_TIMEOUT=45000
DHCP_REQ_TIMEOUT=4000
TFTP_FILE_TIMEOUT=30000
TFTP_PREFIX=0
ENABLE_SELF_UPDATE=1
BOOT_ORDER=0xf412
The main thing we are looking at here is the BOOT_ORDER variable. This particular configuration will attempt to boot in this order: MicroSD Card (2) -> USB (1) -> Network (4) -> Reset (f). If you are wanting to change the order, please note that the boot order in this case is read from RIGHT to LEFT. Once you are happy with the boot order, save the file with CTRL + X. Press Y and then ENTER to save. Now, we will create and write the new EEPROM binary to flash. After that, reboot the Raspberry Pi.
sudo rpi-eeprom-config --out pieeprom-new.bin --config bootconf.txt pieeprom.bin
sudo rpi-eeprom-update -d -f ./pieeprom-new.bin
sudo reboot
After the Raspberry Pi reboots, you should see the activity light rapidly blinking green in a steady pattern and if you have a monitor hooked up, it should be a green color. This is an indication that the flashing was a success. You can use the same MicroSD card to flash every Raspberry Pi that you have.
Raspberry Pi OS
Flashing
Now, set up Raspberry Pi OS. You can realistically do this with any Linux based operating system but Raspberry Pi OS is pretty straight forward. If you used the manual method of changing the EEPROM, you can use the same instance. If you did not use the manual method, then you will need to flash Raspberry Pi OS on to the MicroSD card. Again, I am using the Raspberry Pi OS Light 64 bit image since I am running Raspberry Pi 4s in my network. If you are running anything other than a Raspberry Pi 4, you are safer to use the 32 bit image. The light version can be found in the “Raspberry Pi OS (Other)” category.
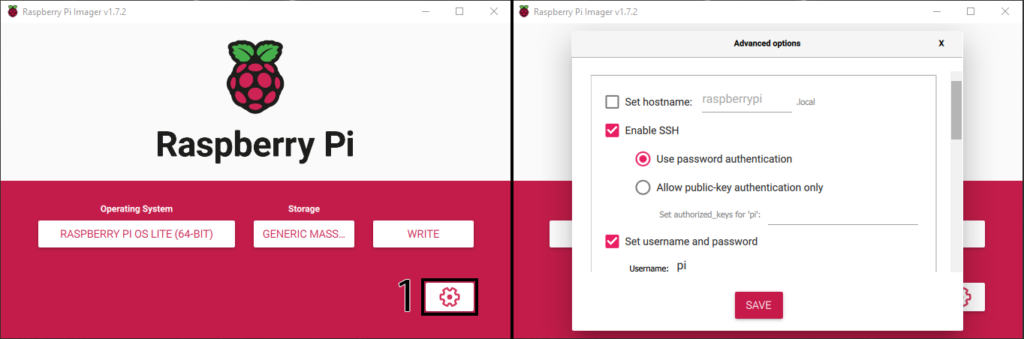
Choose your MicroSD card. I recommend setting up SSH and credentials before flashing the OS. you can do this by clicking on the gear in the lower right corner of the window and setting the options to your fancy. I highly recommend you to set up SSH and changing at least the default password.
Save your options and write the OS to the card. After the writing is complete and verified, place the MicroSD card and power it on.
System Setup
Normal first step of updating packages:
sudo apt update && sudo apt upgrade -y && sudo apt dist-upgrade -yNow, we clone our OS. To do this, we need to install rsync. The following commands will create the folder directory that will match the server (I don’t know if this is necessary), install rsync, and then tar (zipping) both the OS and boot files that we will be actually sending to the server. While taring the files, we use the -p tag to preserve the permissions and ownerships. This is important to do for correct functionality while PXE booted.
sudo mkdir -p /pisystem/RasPiOS
sudo apt install rclone -y
sudo rsync -xa --progress --exclude /pisystem / /pisystem/RasPiOS
sudo tar -cpf /RasPiOS.tar /pisystem
Sudo tar -cpf /Boot.tar /boot
Now, we send the tar files over to the TFTP server. We can utilize rsync to do this. The following commands will place the tar files on the root of the tftp server:
sudo rsync -a /RasPiOS.tar (tftp server username)@(tftp server ip):/
sudo rsync -a /Boot.tar (tftp server username)@(tftp server ip):/
In my case, this would equate to:
sudo rsync -a /RasPiOS.tar [email protected]:/
sudo rsync -a /Boot.tar [email protected]:/
This process should go relatively quickly. There is one more command that we will need to run for the next step which will grab the serial number of the Raspberry Pi:
vcgencmd otp_dump | grep 28: | sed s/.*://gThe above command should output something like c76fda68. Put this in notepad or keep it safe somewhere because you will need it very soon. You will also need to run this on every Raspberry Pi that you wish to PXE boot. Once this is complete, you should be able to shut down your Raspberry Pi and put the MicroSD card in a safe place! Now we move back over to the TFTP server.
TFTP Final Steps
First, lets make sure that both RasPiOS.tar and Boot.tar have both copied over:
ls -l /You should see both RasPiOS.tar and Boot.tar listed. Now, we are going to create the directory for the boot directory for the Raspberry Pi where the boot files will live and then a directory where the system files will live. As stated before, the boot files will live in the /piboot directory in a folder that is named the serial number of the Raspberry Pi. In my case, the serial number of the Pi is c76fda68 (case is important). The rest of the system files will live in the /pisystem folder in a subfolder that can be named anything as long as it is unique. I usually name it the same as the eventual hostname but for this example, I will keep it as my ‘golden image’ and keep it RasPiOS.
sudo mkdir -p /piboot/c76fda68 && sudo mkdir -p /pisystem/RasPiOSNow to extract the tar files in to their respective folders. As with the -p when making the tar files, –same-owner when extracting them is important to keep the permission and ownership the same.
sudo tar --same-owner -xvf /Boot.tar -C /piboot/c76fda68
sudo tar --same-owner -xvf /RasPiOS.tar -C /pisystem/RasPiOS
The second command might take a while. Since I am using this as my ‘golden image’, I will be copying it to make new OSs. I have been wanting to try out Moonlight, so I will copy my system folder in to a new folder called moonlight (since this will become the hostname, which is how I decided on my naming convention):
sudo cp -rp /pisystem/RasPiOS /pisystem/moonlightNow, to link everything together. In the boot file, we need to edit cmdline.txt to tell the Raspberry Pi to boot from the NFS server.
sudo nano /piboot/<serial number>/cmdline.txtReplace the contents of the file with the following command replacing the TFTP ip and directory with your setup:
selinux=0 dwc_otg.lpm_enable=0 console=tty1 rootwait rw nfsroot=192.168.35.252:/pisystem/moonlight,v3 ip=dhcp root=/dev/nfs elevator=deadlineSave the file with CTRL+X followed by Y and ENTER. Next we need to modify fstab:
sudo nano /pisystem/moonlight/etc/fstabChange the contents so only the following is visible or not commented out (# at the beginning on the line):
proc            /proc           proc    defaults          0       0
# a swapfile is not a swap partition, no line here
#   use  dphys-swapfile swap[on|off]  for that
Save the file with CTRL+X followed by Y and ENTER. And finally, we need to update the NFS server
echo "/pisystem/moonlight *(rw,sync,no_subtree_check,no_root_squash)" | sudo tee -a /etc/exports
sudo systemctl enable rpcbind
sudo systemctl restart rpcbind
sudo systemctl enable nfs-kernel-server
sudo systemctl restart nfs-kernel-server
At this point, there is only one more thing to do. You will need to tell your DHCP server what IP the TFTP server is so that it can forward it to each device. This process will vary greatly depending on your DHCP server. I am using OPNsense as my router/DHCP server so I will explain that setup. PFsense users should be just about the same process.
OPNsense TFTP setup
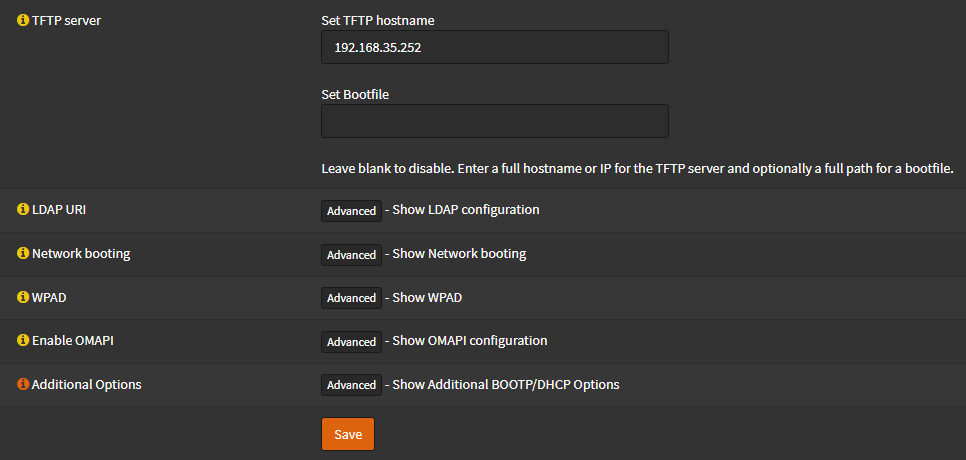
When you are logged in to OPNsense, go to Services -> DHCPv4 -> [Select interface]. Scroll down until you see “TFTP server” and click on it to open that menu. For “Set TFTP hostname”, enter in the IP address that you (hopefully) statically set. In my case, it is “192.168.35.252”. Save the configuration.
Final Thoughts
At this point, you should be able to PXE boot your Raspberry Pi without having to have a MicroSD card! It was definitely a journey to get this to work. I had to use many different sources and kind of bash them together to get a working system together. Overall, I am happy to get this working. It could potentially save a lot of money and headaches from having to buy MicroSD cards.
Sources Used and Credits
ROB FERGUSON – How To: PXE Boot your RPi
blockdev.io – Network Booting a Raspberry Pi 3 from an Ubuntu Server
Raspberry Pi Documentation
Updates
2022/9/3
- Corrected directory: sudo rsync -xa --progress --exclude /pisystem / /piboot/RasPiOS to sudo rsync -xa --progress --exclude /pisystem / /pisystem/RasPiOS
- Corrected directory: sudo tar -cpf /RasPiOS.tar /piboot to sudo tar -cpf /RasPiOS.tar /pisystem
2022/8/28
- Changed sudo cp /pisystem/RasPiOS /pisystem/moonlight to sudo cp -rp /pisystem/RasPiOS /pisystem/moonlight to preserve permissions.
- Initial posting
3rd line below is not correct as you haven’t created “piboot” folder so rsync throws an error ,please update.
sudo mkdir -p /pisystem/RasPiOS
sudo apt install rclone -y
sudo rsync -xa –progress –exclude /pisystem / /piboot/RasPiOS
sudo tar -cpf /RasPiOS.tar /piboot
Sudo tar -cpf /Boot.tar /boot
Good catch. The correct coding should be:
sudo mkdir -p /pisystem/RasPiOS
sudo apt install rclone -y
sudo rsync -xa –progress –exclude /pisystem / /pisystem/RasPiOS
sudo tar -cpf /RasPiOS.tar /pisystem
Sudo tar -cpf /Boot.tar /boot
Guide has been updated.
Just a minor correction in your article. You can PXE-Boot starting from “Raspberry Pi 3 B” not just B+.
The line “sudo rpi-eeprom-update -d -f ./pieeprom-new.bin”
renders the message:”This tool only works with a Raspberry Pi 4″.
So from there I cannot get any further… Is there another tool that is compatible with RPI3 B+?