How to Create Custom Domains with PiHole and NGINX Proxy Manager
If you run your own home lab, you know that things can get pretty wild when trying to remember IP addresses and port numbers. There is a way to fix that!
In my case, I run multiple services on multiple different machines. Unraid and most of my Docker containers on my Dell PowerEdge server, Home Assistant on a Raspberry Pi 4, Multiple PiHole instances on more Raspberry Pis with automatic sync and failover, opnSense on an HP Thin Client, and a few others. It gets really confusing to remember what IP everything is on and then you have to remember ports on top of that!
Sure, you can use a dashboard like Flame to list all of your services, and that is a perfectly viable option. But some of my devices and services I would like to access just as if I was accessing it as a normal website. To do this, I leverage NGINX Proxy Manager and PiHole to create a fake domain that I can use within my network!
Overview
For the most part, taking care of remembering all of the IPs is pretty easy by setting up host names for each of your devices. For example, instead of having to remember “192.168.66.250” for my primary PiHole instance, I would just have to remember “pihole” and type that in to my address bar to access it. But there are a couple of problems with using this method:
- You can have the same hostname on multiple devices. This can eventually confuse the network and make things not load.
- The network needs to be set up to allow the use of host names. Most modern devices allow this by default.
Instead, I use the local DNS records of PiHole to create a custom domain that can be used within my network. It doesn’t even need to be a TLD domain like .com or .net. I use .sudo in my network. This allows me to separate each device in to its own ‘domain’.
If you want to take this even further, you can also use NGINX Proxy Manager to reverse proxy your custom domain to services that uses ports. This is especially useful if you use a particular service a lot. An instances I use within my network: I use Apprise API to send notifications to devices or programs. Instead of having to remember “192.168.0.150:8000/notify”, I can shorten the url down to “apprise.sudo/notify” and use the service like I was typing out the IP and port. Much easier to remember.
Another advantage of using this method is that if an IP changes for whatever reason, you only have to change the IP in one location instead of having to go to each and every application and changing IPs to reference other services.
Pre-Requisites
To follow along with this guide, you will need the following set up and running:
- PiHole
- Docker (If you want to use NGINX Proxy Manager)
- NGINX Proxy Manager (If you want to forward to ports)
I am assuming that you have your routers DNS settings pointed to your PiHole instance so that every device on your network is using PiHole.
Setup
Note
If you want to set up a service that redirects to a specific port, pleas skip to the next section.
Log in to your PiHole admin panel.
On the left menu, click on “Local DNS” > “DNS Records”.
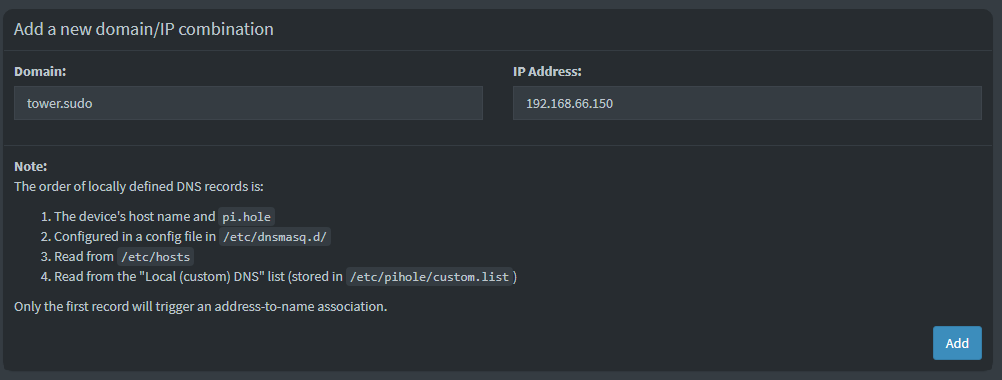
The top section should read “Add a new domain/IP combination”.
- For “Domain”, enter in the domain that you would like to use. It does not have to be a valid domain. For example, all of my domains end in “.sudo”.
- For “IP Address” enter in the LAN IP address that the domain will point to.
In my case, if I wanted to add my domain of “tower.sudo” to point to the LAN IP of “192.168.66.150”, I would enter in “tower.sudo” under domain and “192.168.66.150” for the IP.
Setting up ports
Navigate to and log in to your PiHole admin panel.
On the left menu, click on “Local DNS” > “DNS Records”.
The top section should read “Add a new domain/IP combination”.
- For “Domain”, enter in the domain that you would like to use. It does not have to be a valid domain. For example, all of my domains end in “.sudo”.
- For “IP Address” enter in the IP of your NGINX Proxy Manager instance. NPM has to have ports 80 and 443 accessible to NPM. If 80 and 443 are forwarded to a different service, this will not work.
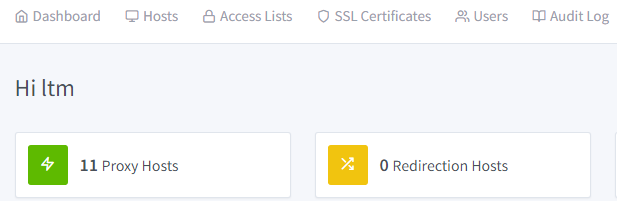
Now navigate to and log in to NGINX Proxy Manager.
Click on the “Hosts” button and then add a host.
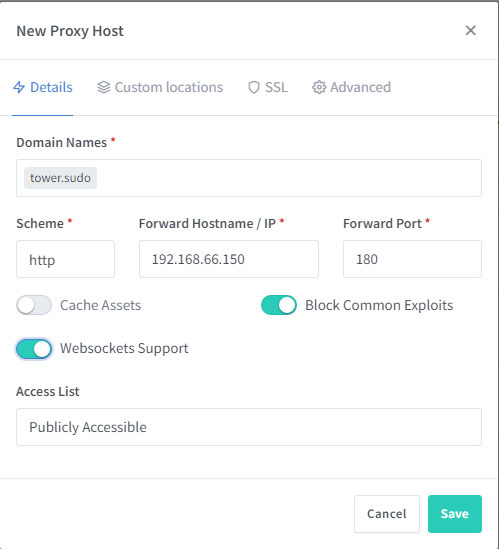
In the pop-up, we only need to fill out the “Details” tab since we are keeping everything in house.
- Domain Names: Enter in the domain that you used in PiHole.
- Scheme: Usually you can just leave this as “http”. Some programs, such as NextCloud and opnSense, you have to access via “https”.
- Forward Hostname / IP: This is the IP that will be the IP that the service is running on.
- Forward Port: Enter the port number that you are forwarding to.
Note
Make sure you hit Enter or Return after typing the URL! If you do not do this, the URL field will not populate. The URL should be surrounded with a gray bubble like in the image below if you did it correctly.
For the toggles below, I usually just toggle “Block Common Exploits” and “Websockets Support”.
Now, you can click “Save”.
Conclusion
Note
The first time you access the new domain on a device, you will have to enter in “http://{domain}” for the DNS to propagate correctly. Every time afterwards, you wont have to enter in “http://”.
At this point, you should be able to access your domain through any web browser as long as both devices are within your network. The nice thing is that you don’t have to use a proper TLD and customize the domain to your content.
I’m curious, can you reverse proxy Pi-Hole and even NgxPM with this method? I tried and it doesn’t seem to work – I guess because I am trying to DNS the DNS, and reverse-proxy the reverse-proxy!?!? So, with pi-hole and NgxPM, you would have to stick with calling the ip address only on these two services?
One last thing; I tried to add my router address to the pi-hole DNS (basically 192.168.1.1) but this resulted in not working. It constantly forced https, and then failed. It doesn’t specify a port to access, so don’t need to rout to NPM, but as it wasn’t working as just a DNS setting, I tried it any way with host and redirect… both had the same issue as just DNS entry. I can’t figure out why this is, but I am putting it down to a security feature on my (internet provider provided) router, do you think that’s a reasonable assumption?
Cheers!
You should be able to, yes. I have both my PiHoles proxied so I can use pihole.sudo and pihole2.sudo and can access them. I actually did this with just PiHole since you access the UI on port 80 alone so there is no need for NPM on this one. I have not tried to reverse proxy NPM but I don’t see why it wouldn’t work.
Usually routers have a security feature that doesn’t allow rebound addresses without specifically setting it up within the router itself. Since it is an ISP provided router and they usually give you pretty crappy ones, I doubt it would have that feature.
Hi, I wanted to use this guide but unfortunately stuck with some issues. I run my ubuntu 22 server on a pc that is accessible on 10.0.0.140. I have portainer installed on 10.0.0.140:9000, nginx on 10.0.0.140:81, pihole on 10.0.0.140:8080. I followed the guide and setup a domain pihole.home and IP address 10.0.0.140. Went to nginx added a proxy host with domain pihole.home and IP address as 10.0.0.140 and port 8080. However, I keep failing and would really appreciate if you could guide me setup this.
I also wanted to ask you what did you meant by “For “IP Address” enter in the LAN IP address that the domain will point to.”
A little about me I am a CS student with very little networking experience as this is my first home lab.
Any help is greatly appreciated.
What problem are you having when you try to reach the domain? Is it going to a Google search or something? If that is the case, you will need to enter “http://” in front of the domain first so it will get treated as a domain query. This only has to happen once for each domain that you add. In your case, try “http://pihole.home”
Also make sure that your device is using PiHole as your DNS. You can either set this at the router level to have every device in the network to benefit from it, or set it at the adaptor level of your devices.
Thanks for the quick response. Were my steps to setup the domain and ip in the pihole DNS page correct?
I tried “http://pihole.home” and I get the “failed to connect to the server error” (using safari). if I omit http then it goes to google which its supposed to happen I guess.
Also, one more thing when I tried to add the proxy host I got this “Internal Error” from ngnix but when I refreshed the page it goes away (I don’t know what’s wrong with it).
I should’ve mentioned this earlier, my plan for my home lab is to run multiple dockers ( next cloud, nginx, pihole, hole and few more ) and I want to use all the containers through nginx reverse proxy so that I can use the port 80 etc.
For my current issue, I think I need to assign a separate IP address to the pi hole container in order to use your guide ( correct me if I am wrong ) because right now its using my ubuntu server ip 10.0.0.140 (for dns) and 10.0.0.140:8080 (for the admin page) . However, I got no clue how to assign separate ip, been researching about it past hour.
As long as your DNS points to port 53 (which PiHole does by default), you should be able to share the IP address with other services. If you are running PiHole in a container, just make sure that you have the port mapped; Especially port 53. It should be in there with (I think in your case) 80:8080. It should look something like:
ports:
– 80:8080
– 53:53
If you can, can you send me your compose file in a pastebin or something similar? Be sure to remove any sensitive info like passwords and such. I am mainly interested in the PiHole section of your compose file.
I’m also having trouble getting this working, I have pihole and npm in separate docker containers with separate IP addresses, my router (PFSense) is set to use pihole ip as DNS and seems to be working fine, I have a local DNS record with domain emby.home and the IP address for my npm container.
In npm I have a proxy record for emby.home pointing at the emby ip address and port.
I get a site can’t be reached error in chrome on Android.
Is the domain set up on the PFsense side or PiHole side? Also, did you make sure that websocket support is enabled?
Forgive the noob question, but how do I get the NPM dashboard? When I install NPM using apt on a Proxmox Debian container, I get no GUI and as such I have no ability to add hosts in the way this document suggests. I’m sure there is something simple I am missing. How do I get the GUI dashboard shown here?
Could one use 127.0.0.1 for the pihole ip? I have a unique situation where my pihole hits the road with and often the ips change.
Hello, I would like to know how we could redirect services like “pihole.home” to the internet, I have not contracted a godaddy domain, but I can use No-ip for it, I would like to configure it like the “samples” of the “SWAG” application “, generates locations for each service, for example: “myservice.ddns.org/pihole” or “mysubdomain.ddns.net/portainer”, and also with port forwarding, for example; “synologynas.local:5001” forwards to “myservice.ddns.org/syno”, maybe it can be done with pihole’s DNS and help from CloudFlare, anyway, the nginx proxy manager generates certificates with letsencrypt.
In my experience I have been able to use “SWAG” with duckdns.org, but I would prefer to work with NOIP.
I read a comment above that referred to Phantom Domains, it would be crazy to create a domain like “thebestnaspihole.com” that forwards to “myservice.ddns.org”
Something more complex, but I think it would ensure the connection, it would be support in “AAAA” records from Cloudflare and pihole.
Does anyone know what I’m talking about?
Is it better to buy a cheap domain in order to avoid subdomain problems?
Hello, thank you for your guide! I am using Unraid, PiHole and NPM as well and setup everything like in your tutorial but when I try to open the domain I get an “Connection refused” error in my browser. What could cause this error?
Good tutorial.
My setup is a raspberry pi with pi-hole and NPM in a Proxmox CT.
All my local DNS entries in pi-hole point to the IP of the NPN
In the NPN I have created an entry for i.E
jelly.lan http 192.168.x.x 8086 with Websocket support enabled.
All works fine.
Hey,
I was following this guide and was really bothered by the why of needing to enter http://. I was also encountering problems with iOS devices not being able to resolve the subdomains correctly.
I think I might have figured out a solution. If you go to Nginx Proxy Manager -> Settings -> Default Site and set it to 404, it will magically start working for iOS devices. I think the reason for this has to do with HSTS headers using the includeSubDomains setting which will stop safari and other browsers that follow this directive from loading http pages on subdomains if the main domain supports https which NPM does.
Hope this helps out someone else!