Easily Fix Controller Drift with Helder’s Mod
Back in May of 2021, a modder that goes by “Helder” released a flex PCB that aims to fix analog controller fix in the more popular controllers such as the controllers for Xbox 360, Xbox One, Xbox Elite Series 1 & 2, Playstation 4 & 5, and the Switch Pro controller. Helder got the idea to come up with this flex PCB from a video he watched by SolderKing on YouTube.
The joysticks themselves has potentiometers (pots for short) that, like all pots , wear out over time. This is exasperated by the amount of use these joysticks get. When they start wearing out, the pot starts sending a constant signal in a certain direction. This is what causes “controller drift.” The flex PCB that Helder has created aims to offset the value that the pot is sending to bring the value back to 0.
This, however, will not fix all issues:
Some pots will outright fail but the joystick will be perfectly fine. If that is the case, then Helder sells the pots themselves on his store for about $2 a pair. The risk with this is that there is not a guarantee that the new pots will be zeroed out. You can then use the flex PCB to fix the drifting.
If there is actual damage to the joystick, then the whole joystick module needs to be replaced.
Though complete replacement of the joystick modules are cheaper, they will eventually wear out as well and then you would be back to square one. With Helders flex PCBs, all you would have to do is open your controller, adjust the pots attached to the flex PCB, and then your controller back up. Overall, a 10 minute job after the initial installation.
Where to Purchase
There are different versions of the flex PCB. Please make sure that you get the correct version for your controller(s).
Helder’s Game Tech
- Xbox One, Xbox One S/X, Xbox Elite (Series 1), Playstation 4, Playstation 5, and/or Switch Pro controllers
- Xbox Elite Series 2
- Xbox 360
- Xbox Wolverine Ultimate
ZebLabz (United Kingdom)
- Xbox One, Xbox One S/X, Xbox Elite (Series 1), Playstation 4, Playstation 5, and/or Switch Pro controllers
- Xbox Elite Series 2
- Xbox 360
How to Install
This does require a small amount of soldering skills. This is very beginner friendly though.
The first thing you need to do is take apart your controller enough to be able to get to the main PCB that the joysticks are attached to. iFixIt has wonderful, user submitted guides that should work.
iFixIt has very good teardown guides for Xbox 360, Xbox One, Xbox One S/X, Xbox Elite Series 1, Xbox Elite Series 2, Xbox Wolverine Ultimate, Playstation 4, Playstation 5. Please note that some controllers have different versions or do not have a guide to disassemble them. Usually, a quick Google search will have a teardown guide.
When you have your controller torn down, you can apply the flex PCB. Helder has released a few videos on how to apply the flex PCBs for the Xbox Wolverine Ultimate, Xbox 360, and the Xbox Elite Series 2 controllers. For the most part, you can follow the instructions in his videos to any of the controllers.
Helder also highly recommends cleaning out the joystick assembly and pots with Isopropyl Alcohol. This will help clean out any dirt that has gotten in to the assembly over time. Click this link for a video.
Macho Nacho on YouTube has a very good video that explains the installation steps for PS5, PS4, Xbox Series X, and Xbox 360 controllers. You can check it out here or in the video below.
Tips
- Try to get your flex PCB as flat to the board as possible. This is easiest done with a hot air rework station but can be done with a soldering iron.
- Put some fresh solder on the pins before trying to solder on the flex PCB; Especially if the controller is old. Solder can weaken over time and crack. Introducing some fresh solder and flux can make the old solder easier to melt.
- While this flex PCB does work on a Switch Pro controller, it is not recommended in my opinion. In my testing for Helder, the Switch Pro controller seems to have a significant dead zone (an area around center where movement does nothing) baked in to the controller. If a Switch Pro controller starts drifting, then the joystick module itself needs to be replaced in my opinion. If you really want to apply this flex PCB to the pro controller, then the case does need to be modified to fit the flex PCBs.
How to Calibrate
Calibrating your joysticks is pretty simple. There is a very helpful website called Gamepad Tester that allows you to test every button and the joysticks of any controller. While you have access to the flex PCBs, connect your controller to a computer while you have Gamepad Tester opened up in a browser window.
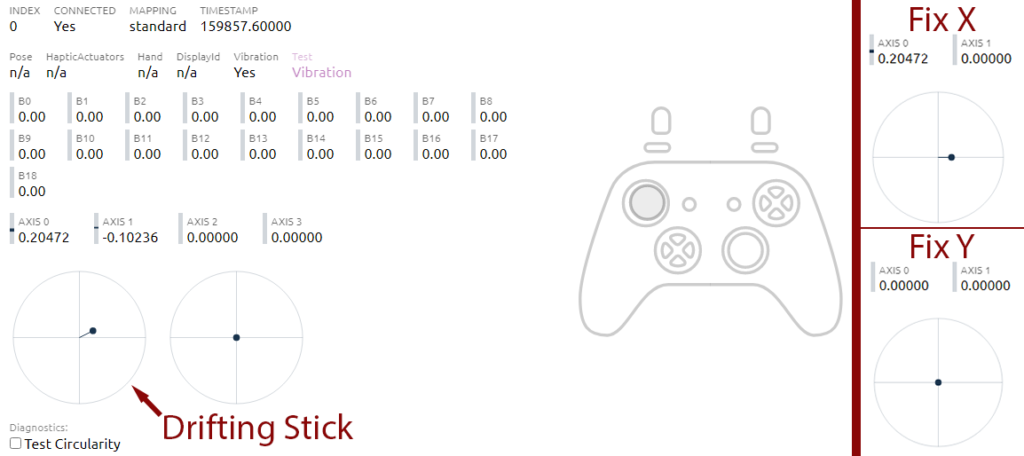
Once you have the website open and your controller connected to your computer, you should see your controller pop up. If it does not pop up, move your joysticks or hit a button and it should pop up and you should see something like the image below.
Without touching the joystick, take a small screwdriver and rotate one of the screws slightly in one direction. It does not take much (probably 1/16th turn) to notice a change in the joystick. The goal is to get the value to read as close to 0 as possible. Some controllers will jitter a little bit and that is fine. Then, move to the other screw and adjust in the same way. Now, the target should be pretty close to the center. Repeat for the other joystick.
In Macho Nachos video above, he goes through the calibration process starting at 11:09.
Installation Service
If you are not able to solder, I will be offering a service in the near future to install and calibrate the flex PCB for you.