Flashing an Image to a MicroSD Card
In this guide, I’ll be showing you how to flash an image to an SD card using Etcher. The reason we need to do this for a Raspberry Pi is because the Raspberry Pi itself does not contain an operating system. You need to flash a system image to the microSD card for the Pi to be useful. You can use network booting in certain situations, but that is beyond the scope of this guide.
Depending on what you are wanting to do, you will need a different image file to flash. Say that you are wanting to start a webserver, the image that I start out with is Raspbian Lite. If you want to make a Pi in to a retro gaming console, then you are going to want to download RetroPi. It’s up to you to find the correct image to flash.
I will be assuming that you are using Windows to complete this process.
Here is a list of images that I think people that take the time to look at this website will use:
Flashing the image to the MicroSD card:
So the first thing to do is to download the image of the system you want to use and Etcher. Etcher is an easy to use image flashing program that makes it rather foolproof to mess up your operating system accidentally.
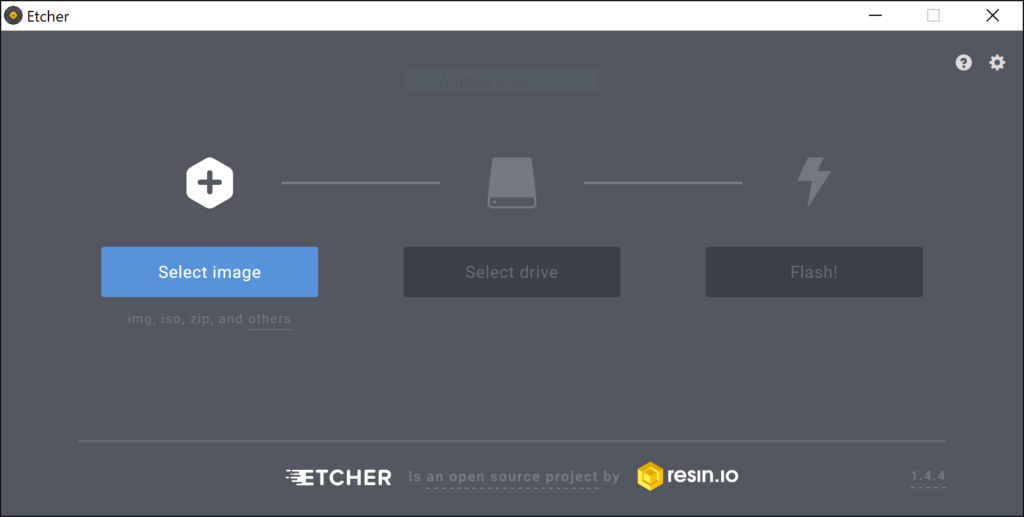

When you have the image and correct device to flash the image to (Etcher is good about selecting the device you want. It selects removable storage first before listing any extra internal drives you have. It will not let you flash and overwrite your computers file system.) selected, simply hit the “Flash!” button and let Etcher do its magic.

Now, safely eject your microSD card and plug it back in to the computer so that you are able to see the boot drive. You will see the error again about there being an unformatted drive. Simply close the window or click on “Cancel”.
Create a wpa_supplicant.conf and ssh files:
Now that you have the file system flashed, you need to be able for it to connect to the internet so that you can SSH in to it and install the rest of the components you need to run our own website. To do this, you need to create a wpa_supplicant and ssh file on the root folder of the boot drive. Lets start with the wpa_supplicant.
Note: If you are using a hard wire connection on say a Raspberry Pi 3B+, you can skip the supplicant part. You will still need to create the SSH file.
I have made a tool on Codepen that will allow you to enter in your WiFi info and download a properly configured wpa_supplicant.conf file. Simply put in the info, click on “Download wpa_supplicant.conf” button, and move that file to the root folder of the boot drive.
If you are looking to do this yourself and are using WPA/WPA2 security on your WiFi (If you enter in a password, you most likely are), you can download a blank supplicant and edit the file in your favorite text editor as long as its NOT Notepad or Wordpad built in to windows or any of the Office suite (Word) as they do not support unix line breaks. Notepad++ is the most popular free solution.
To make the SSH file, you need to create a blank file called ssh. To do this, you are going to need to be able to edit file extensions. To turn this feature on, please follow this guide. Now, create a new file on the root folder, and name it just plain ssh. No file extension or anything. The way I do this is when I rename the file, I hit Ctrl + A and type s-s-h (without the dashes) and hit Enter. Windows will warn you about changing the file extension, press the yes button. Alternatively, you can download and unzip the file to the root directory of the boot drive.
Now that you have the SSH or both the files that you need to connect the Pi to the network, can can now safely eject the microSD card, plug it in to our Pi, and plug in the Pi to let it boot. This might take a couple of minutes for the first boot.
Find the IP address of the Pi
So this is going to be the hard part because the process is going to be different for everybody. Basically you need to log in to your router, find a list of attached devices, and find the IP address associated with your Raspberry Pi. Really, my only suggestion is to find the model name of your router and google how to list the devices connected your router. When you get to the list of devices, you are looking for the IP address of the device named “RASPBERRYPI”. It should look something along the line of this:
In my case, the IP I am looking for is “192.168.1.14”. Remember this, write it down, because you will be needing this.
Use SSH to remote in to the Pi
Now that you have the hard part done, let’s get to installing everything.

If you want to save this info, you can input a name in the “Saved Sessions” box under all that and click on the “Save” button. This way, whenever you need to connect to your server, you can just double click on the name to connect instead of having to remember the IP address.
On the bottom of the screen, click on the “Open” button. This will bring up a console looking window. It should ask you for a username and password.
The default information is:
Username: pi
Password: raspberry
While typing in the password, it will remain blank even while typing. This is normal. Is is just a security feature to prevent wandering eyes from getting your password.
After logging in, you will get a message that says:
“SSH is enabled and the default password for the ‘pi’ user has not been changed. This is a security risk – please login as the ‘pi’ user and type ‘passwd’ to set a new password.”
passwd and hit Enter. You should get a screen asking you for the current password. Type in raspberry and hit enter. The next line will ask you for the new password. Enter in the password you would like it to use (case sensitive) and hit Enter. It will then ask you to confirm the password. Enter in your new password again and hit Enter. You should then get a prompt that says “passwd: password updated successfully”.
After a new password has been set, you want to update the system. To do this, enter in the following lines hitting the Enter key after every line:
sudo apt update
sudo apt upgrade -y