MintyPi V3
So back in August of 2018, I was perusing the interwebz and saw a video on how to build a Gameboy Zero. And in one of YouTubes wonderful suggestions was the build guide video of the MintyPi v2. I instantly thought, “I WANT ONE NOW!” So, I started perusing the Sudomod website and after about half an hour of searching that the v2 had been discontinued. I was sad. But I did discover that v3 was in the works! So I started following the design process and production of the v3. And in March of 2019, I finally have my own MintyPi!
What is a MintyPi you ask? Well, simply put, it is a RaspberryPi Zero W with a custom PCB designed by Helder at Sudomod put in to an Altoids Tin that runs EmulationStation and RetroPie to be able to play retro games from systems like the Nintendo Entertainment System (NES), Super Nintendo Entertainement System (SNES), Gameboy (GB), Gameboy Color (GBC), Gameboy Advance (GBA), Sega MegaDrive (AKA Sega Genesis), and pretty much any console up to, but not including, the Nintendo 64 (N64). Wermy, the owner of Sudomod, has taken the system one step further by creating 3D printed parts to really make the MintyPi look beautiful! They have worked very hard and for a long time to make v3 the best that they can. And I must say, it was well worth the wait!
| Item | Price |
|---|---|
| MintyPi v3 PCB Kit | $90 |
| MintyPi Custom Battery (US) | (EU) | $10 | £10 |
| Laser Cut Altoids Tin | $10 |
| 3D Printed Parts | $35-45 |
| Silicone Buttons | $8 |
| RaspberryPi Zero | $10 |
| MicroSD Card | ~$17 |
| 3D Printed Protective Sleeve (optional) | $15 |
Parts and Materials
MintyPi v3 PCB Kit
This is the 3rd version of the PCB kit made by Helder over at Sudomod. It is an AIO board that makes things much simpler than the previous versions. You don’t have to source other parts like a USB sound card, and battery charging board. It is all built in!
This is a required purchase. You will also need a couple of extra wires to solder on the speaker. You can use hookup wire or I have used magnet wire.
You can purchase the kit over at Helder’s website.
MintyPi Custom 2200mAh Battery
These batteries are custom made for the MintyPi v3. The 2200mAh gives you a couple of hours of play time. I honestly think it’s a shame you really don’t get to see the battery once the unit is completed because it does look pretty cool.
Because batteries are a pain to ship internationally, these are only available in the US and UK. US orders can be placed from Helder’s Website and UK orders can be placed over at Galaxy Gaming.
Altoids Tin
Altoids can be bought at your local store if you are in the US. There are other tins that will work also like these or you can even order blank tins as well. As long as they are the same size as an Altoids tin, you should be good.
Helder has laser cut tins available at his website. These have all the holes cut by a laser so they are very precise and clean. I had my own personal tin laser cut after messing up a test tin.
3D Printed Parts
The 3D printed parts makes up the majority of what you see when the tin is open. You can either purchase the parts from Wermy in a single color ($35) or multi-color ($45) style. I highly recommend the multi-color. Either way, you will get the screen back, bezel, power board bracket, face plate, drill guide (for if you are drilling your own holes), all needed screws, magnet, and button cutting guide.
If you have your own 3D printer, Wermy has released the STLs to Thingiverse. He included everything you will need to even do multicolored prints using a Palette 2. If you are printing your own parts, you will need to source your own screws and magnet. Luckily, Wermy sells them over in the Sudomod Market.
Optionally, you can purchase a protective sleeve made from flexible TPU. When you’re not playing your MintyPi, you can put it in this sleeve for protection and keep it looking nicer for longer.
RaspberryPi
The RaspberryPi is the computer that runs the MintyPi. This is what you solder on to the button controller. You can get them from various places. Online, Adafruit is basically the cheapest place that I know of that you can find one that isn’t overpriced. The catch is that you can order only one at a time. This is a limit set by the RaspberryPi Foundation and is basically net wide. Sometimes, you can find one or multiple on eBay for cheaper. I have made a customized search that weeds out most of the extras and displays only the RaspberryPi. It’s not perfect, but it does do a pretty good job.
If you are one of the lucky people that live near a MicroCenter, you can pick one up for $5. Each additional Pi is $10. This is in store only. I have heard people order one online, pick it up using the pick up center, grab another, go to another register and pay only $5 for that one also. YRMV.
MicroSD Card
I personally use a 16GB MicroSD card and have plenty of room. But I only load the games that I will play and not every possible game I can on it. You’ll want something either Class 10 or UHS 1 speed and above. I usually go for a reputable brand like SanDisk 16GB or Samsung Evo 32GB cards.
Other things you will need
- Soldering Iron
- Solder
- Flux paste or a flux pen
- Multimeter
- Kapton Tape
- Hookup Wire or Magnet Wire (for the speaker)
- Files (Only if not getting laser cut tin)
- Small philips screwdriver
Build Guide
Common Problems, Fixes, and Suggestions
Since wermy did a really good job on the build guide, I am not really going to create a written version of it but really just collective post of common problems, fixes, and suggestions.
Continuity Checking
When you finish soldering on the Pi, you want to save yourselves a bunch of headaches and check for continuity not only between the Pi and the test pads, but also between all of the GPIO pins themselves. To check the Pi to the test pads, place your multimeter in continuity mode and follow the green lines in the image below to test the continuity between the two points. If you do not have continuity between any of the points, you need to reflow that GPIO point. Wermy suggests melting the solder, taking a piece of tinned wire, putting that wire in the GPIO and wiggling it around a bit, and then removing the wire and iron to help make a good connection between the GPIO and contact pad. I usually up my iron about 25 degrees and making sure I get in the GPIO hole and the pad below and this usually works. Once you have reflowed the GPIO, go back with your multimeter and check for continuity between the GPIO and it’s corresponding test pad.
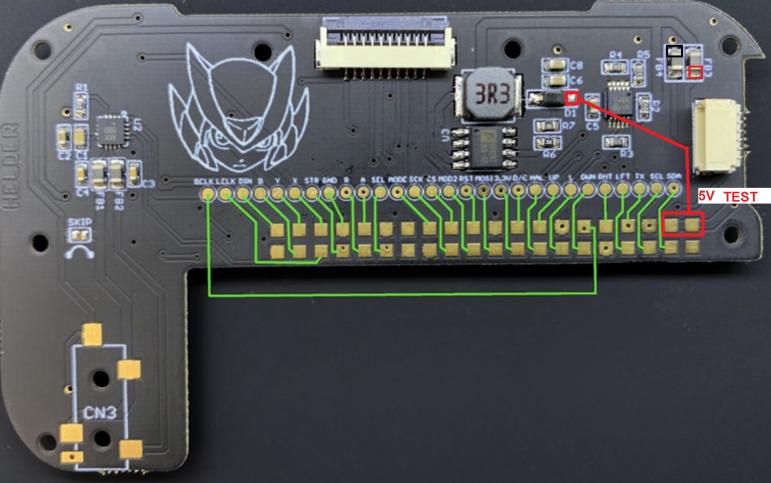
Now that you have continuity between the GPIO and the test pads, I would recommend checking to see if you have any shorts. To do this, I start on the top left of the GPIO and work my way to the right. With my multimeter in continuity mode, I place one (lets say the black one even though it doesn’t matter) prong in the top left GPIO pin and then the other (red) prong on the pin below it, then diagonally to the lower right, and then the pin to the right of the initial prong. Then I move the first prong (black) one to the right where the second prong (red) just was and then repeat the process of the second prong (red) blow, diagonally lower right, and right of the first (black) prong. Just keep repeating this process until you get to the other end. The only two GPIO pins that should have continuity are the two top right pins. They are outlined in a red square in the above picture.
If any of the other GPIO pins have continuity, then there is a bridge under the Pi. There really isn’t an easy way to remove the Pi without damaging anything, especially if you have not done it before. Wermy covers a couple of ways to attempt this in his video. If you do not feel comfortable removing the Pi by yourself, I do offer a service to do it for you. You can find more information about this over on the Sudomod Forums.
Speaker
You don’t need much wire to solder on the speaker. I use 28 gauge magnet wire. Just place the speaker at the top of the button PCB with all of the soldering pads facing up, cut the amount of wire you need to go from the speaker pad on the button controller to the copper pad (not the one that already has solder on it) on the corresponding side of the speaker, clear some of the coating off on each end of the magnet wire, tin both the speaker pads and controller PCB pads, and then solder the wire in connecting the speaker and button PCB. I will post a picture of this method when I get another kit to put together. I have found that doing such a short connection is a good length to fold the wires over and not have to mess with them much to get the speaker to fit in the 3D printed face plate.
amazon Amazon Associates Program
As an Amazon Associate, I earn from qualifying purchases. There is no extra cost to you.
Hello, would you be able to make one mintypi for me? I saw your post on the other site and wondered if you would be able to do the same,
If you are able, please message me via email!
I would really appreciate it.
Yeah, I can make one for you. I will email you shortly.
Yeah I’d be down for this purchase, how do we go further with this?
Hello, I know this is a bit old, but are you still selling them?
could you make one for me
thanks
Can you make another comment with am email that doesn’t make me think it’s a spam email please? Emails are hidden from everyone but me.
I am having issues with my minty pi not powering up from the battery. It powers up from the usb.
Have you checked all continuity between the Pi and the test pads? That is the most common problem in this situation. Other than that, you may want to post on the Sudomod forums for support. https://sudomod.com/forum/
How much do you sell built mintypi’s for?
You can see a list of my services here: https://ltm56.com/mintypi-v3-services/
can you please make a mintypi for me
Unfortunately, Helder is not able to source the screens anymore therefore there are no more kits available. There is a lite version coming soon™ that I will probably be making a service for.
Will the screens end up being sourced from somewhere else? I really wanted to make this come summer.
Helder can source the screens but they cost considerably more. He would have to raise the price of the V3 to be able to sell them again. The lite version still plays the same but the differences are that there is a slightly smaller screen, there is no halls shutdown (does not shut off when you close the case), A little more work soldering wise, the power button has been replaced with a switch, and no headphone jack.
hello ho wmuch would a minty pi cost just to know?